Thursday, January 21, 2010

Ads Theme Template

Click to enlarge Ads Theme Blogger template

If you’re looking for a new Blogger template, you came at the right time. Hands down, this is the best template we’ve converted here at eBlog Templates. It’s a wonderful web 2.0 popular blog layout with some great built in ad spots (hence the template name) and features.
It’s either a two or 3 column template (you can change it on the fly) so you get the best of both worlds. This Blogger template is what I call a “powerhouse” template since almost all the features you need are already built in. On top of that, it’s quite easy to setup and makes your blog look like a professional site without much effort.
I predict this template will be a top template on this site within a few months, if not weeks. With the amount of effort that went into converting this template and attention to details, I sure hope you appreciate this free amazing new xml Blogger/Blogspot template.

Features Include

  • Two or Three right side columns which are easy to switch (default is three)
  • Three great location ad spots (header banner 468 x 60, three 125 x 125 buttons in sidebar, and a 468 x 60 AdSense banner above the first post)
  • Integrated Feedburner rss and subscribe via email sidebar module (also includes “add to favorites” Technorati link)
  • Built-in live traffic feed widget from FEEDJIT
  • Built-in MyBlogLog and BlogCatalog recent reader widgets
  • Dynamic tabs easily created by editing the link list widget
  • Search box without the need for a “go” button
  • Recent posts and comments widgets
  • Nicely designed individual blog post comments section
  • Properly setup Blogger layout editor
You can see from this screenshot that the actual editor is nicely setup so you don’t need to scroll or try and figure out how to click on the “edit” widget links. Most templates that you download make it tough to edit — not this one!
ads-theme-layout.jpg
This template does require some configuration in order to get it working as designed. Please follow the steps below if you’d like it to work properly. I also recommend backing up your existing template before changing just in case you run into any problems. You could also setup a new Blogger blog as a test area and try installing it there first.

Top Tabs Setup

When you first install this template the top tabs will not be visible which is normal. You’ll need to go into the Blogger page element layout editor and edit the “Top Tabs” widget. It’s a link list so just add whatever tabs you want. Don’t add a “Home” tab since it will automatically appear once you create and save the tab widget.

Header Ad Banner

The default banner is hardcoded into the template but will disappear when you add anything to this widget. It’s an HTML widget so you can put the banner ad code straight into this box. This widget can also be deleted if you don’t have a 468 x 60 and you’ll just be left with the black header. Here’s the default ad code if you want to use it as a model:


FeedBurner RSS and Email Links

To get this section working you’ll first need to have a FeedBurner account. If you don’t already have one, please read the “How to Setup FeedBurner on Blogger” article and then come back. Another option is to just delete this widget if you’re not interested in knowing your subscriber count or allowing your readers an easy way to subscribe.
Once you’ve got your FeedBurner account, you’ll need to edit this template code and replace a few parts. Search your template code for the following line and then look right below that for the rss feed link.
http://feeds.feedburner.com/YOUR-FEED-NAME-HERE . Replace the text in red with your FeedBurner name (i.e. eBlogTemplates is ours)
Next we’ll need to update the subscribe via email link with your feed id. You’ll need to make sure to enable subscribe via email within FeedBurner otherwise this part won’t work.
http://www.feedburner.com/fb/a/emailverifySubmit?feedId=YOUR-FEED-ID-HERE&loc=en_US
After you’ve changed both of these areas save your template and check to see if it works. If you’re having trouble finding your feed name or id, please read our article above or see FeedBurner’s help section to locate it.

125 x 125 Ad Section

These are the three ads in the right sidebar which you need to edit the template code to change. Search the template code for and then look right below that for the three lines of ad code which are:


If you’ve got ads to place in here, then just paste the code into the template. I recommend signing up for your own Text Link Ads account and using them. Each referral you convert, you get $20 (or $25 I forget). If you don’t have ads to use, you can either leave our default ads or delete this widget altogether.

Recent Posts and Comments Widgets

This one is easy to setup since we’ve already written an entire article dedicated to this. Please see “How to Setup Recent Comments and Posts Widgets” to configure these two widgets.

Recent Readers Widget

You’ll need to have MyBlogLog and BlogCatalog accounts if you want to use this widget. The default widget will show the original author’s pictures so please either delete this widget or change the account ids to your own. Once you’ve setup these up, then edit the template code and search for and then replace the account numbers with yours.

Live Traffic Feed Widget

This is a really cool feature within this template and the best part is you don’t need to do anything to setup it up! There are some further options if you click on “options >>” on your actual blog page under the widget but that’s it.
You should now have the template all setup and ready to go. I hope you enjoy this beauty and please make sure to keep the footer links intact since numerous hours of my time and the original designer were put into making it. That’s all we ask for giving away this template! Enjoy!
Special thanks to Eric over at Blogging Secret for designing this wonderful template originally for WordPress.

Labels: ,

Tuesday, January 12, 2010

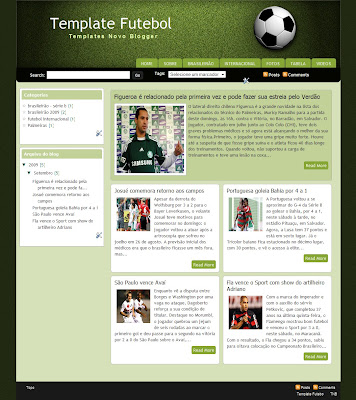
Template Futebol

template futebol 

Labels: ,

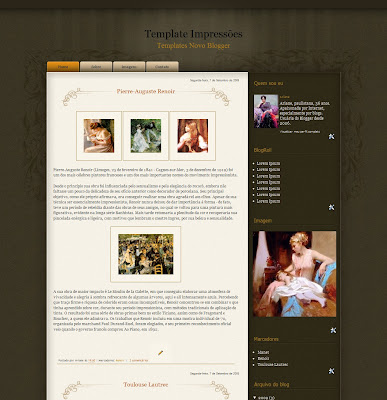
Template Impressões

template blogger

Labels: ,

Template Blue


Labels: ,

Template Setembro


Labels: ,

Template Férias


Labels: ,

Monday, January 11, 2010

How to install Blogger Templates downloaded from this site??

Everyday so many readers leaving comments asking "How to install xml blogger templates?".
So, to make it easier for you, here is the complete tutorial on how to install blogger templates downloaded from this site..

1.First download the template and unzip the file using winrar or winzip. After extracting the file you will see a folder named Images(incase if you lost) and an xml file.

2.Now, sign in to Blogger dashboard and click on the layout.

click on the layout

3.Here is the important step, after uploading any new Blogger template, all of the previous widgets like your google adsense ads,text,profile,poll,etc etc will be lost.
So, to avoid this to happen, in this step click on 'edit' on all the widgets and copy the codes into notepad,etc.

backup widgets

4.Next, click on the 'Edit html' tab

edit html

5.You'll see an option to download the current template, so do it!

download the template

6.Just below that,there's an option of uploading new template.So, use the Browse button and upload the downloaded xml file(which we discussed in step 1).

Upload the template

7.Now, a message appear saying that your widgets are about to be deleted.Click on the Confirm & Save (no problem doing this because we already copied the widget codes in Step 3).

confirm and save

Now you successfully installed the template :)
Click on the 'Page elements' page now and add the codes that you copied in step3 using the 'Add a Page Element' option.

Note:The *Images(incase if you lost)* folder contains all the image files used in the template.
Daily thousands of template copies are downloading from this site.. so, in future if my server bandwidth exceeds, you may see images not loading in your sites.So, For this not to happen, Upload all the images to your own server..
Doing this is very simple, Click on the 'Edit html' and go through the template code and replace all the image links(starts with http and ends with .jpg or .gif or .png) with the direct image links you got after uploading the images to any Free image hosting service like photobucket,etc. and SAVE THE CHANGES.

Labels: ,

Falkner Press

After the huge hit of my previous two Magazine style Blogger Templates Turnout Mag and SchemerMag, here is my latest yet another Mind Blowing Blogger Template "Falkner Press".
Yes! It's simply Mind Blowing with so many cool features including Automatic Thumbnails and Automatic Post summarize on homepage, Youtube video integration,etc.
This was converted from a wordpress theme designed by CamelGraph.com.

FalknerPress Blogger Template
Main Features:
* Automatic Thumbnails on posts
* Automatic Post Summarize
* Featured Content Slider
* Adsense ready
* PSD Custom Logo Included
* Youtube Video embedding Integrated
* Fully SEO Optimized
* Advertisement Block Ready
* 3 Columns
* Social Bookmarking Icons
* Twitter Updates widget
* Feedburner Email Subscription ready
* Thumbnails on Recent Posts in Sidebar
* Integrated Search box
* Beautiful top Navigation bar
* Cross-browser compatible
* and many more....

Labels: ,

Charcoal Blogger Template with 3 Columns

Previously, I Converted Popular Charcoal 2 column wordpress theme into Blogger xml format.
Just a few days before, the 3 column version of the wordpress theme was released by Jinsona of web2feel.com and so many readers are leaving comments daily asking me to convert that 3 column version into Blogger template.. So, here it is guys.. the much awaited Charcoal Blogger Template with three columns is ready to download.
screenshot

As usual, after downloading and installing the template,change the top navitation links

edit the navigation linksScroll down the template and find this code:


and replace the text (Home,About,Pictures,etc) and write the link to that page by replacing the YOUR-LINK-HERE


Hope all like the template!

Labels: ,

Unbound


Want something that looks professional and natural looking? Well, here it is :) Unbound is not only a little professional looking but also is minimalistic and has a clean design. It was a request from my friend Earl but personally I like this template too ;)
Based on a web template by styleshout.com, I created this template for Blogger.com blogs.

Download  View Demo

Labels: ,

Grunge Floral


Starting a new year with this beauitful Blogger template couldn`t get any better than this. It`s cute, floral and beautiful. I hope you`d really like this template for your blogs.
Based on a Wordpress theme by Russia Tours and created by me for Blogger.com blogs.

Download View Demo

Labels: ,

Furniture


Furniture is a simple looking Blogger template with a little bit of an elegance. The layout is clean and wide.
Based on Wordpress by Modernfurnituremiami.com and created by me for Blogger.

Download  View Demo

Labels: ,

Neonix


Neonix is light and cool looking Blogger template designed by FreeCSSTemplates.com and created by BlogandWeb.com

DOWNLOAD  VIEW DEMO

Labels: ,

Modern Magic


Modern Magic is very cool looking template. The template has a nice design with some awesome graphics.
Based on Wordpress by Webhostinggeeks.com and created by me for Blogger.

Download  View Demo

Labels: ,

Field of Dreams


Here is another wonderful Blogger Template for you guys "Field of Dreams". As you can see, the template is very good,professional looking two column blogger template. Originally it was a wordpress theme designed by notsoboringlife.com. I converted it to Blogger Format.Hope you like it :)

Labels: ,

"Japanese Fleur" BLOGGER TEMPLATE

"Japanese Fleur" BLOGGER TEMPLATE - FREE DOWNLOAD:

Blogger Template Screenshot
Here is my another excellent blogger beta template.The template was originally a wordpress theme designed by Lorelie for wordpress.org users.Now, I converted it to the XML Blogger beta template.
You can view the Live Demo here or look at the above screenshot and download this beautiful template here.

Labels: ,

Pizza


Pizza is very cool Blogger templatefor pizza lovers designed by FreeCSSTemplates.com and created by BlogandWeb.com

DOWNLOAD VIEW DEMO

Labels: ,

Maggo magazine blogger template

Maggo is an excellent magazine theme original designed by ChiQ Montes. After working for more than 6 hours, I was succeeded in converting it from Wordpress Theme to Blogger Template and now it is available for you – Bloggers
The original Wordpress theme is not widget ready, but I tried to widgetize it when I converted to Blogger Template. With the amount of effort that went into converting this template and attention to details, I sure hope you appreciate this free amazing new XML Blogger/Blogspot template. An important note for you : make a right decision before deleting any widget because when you re-add them, they will not show correctly !!!
Maggo magazine blogger template


Preview | Download


Main features

  • Three columns with left and right sidebar
  • Good design with nice color scheme
  • Built-in RSS feed and Email Subscription links
  • Built-in Search box
  • Nice navigation tab
  • Nice comment box
  • Ad boxes ready (125×125)
  • Google Adsense ready (468×60 banner, 120×600 sidebar, 250×250 sidebar)

Labels: ,

TURN OUT MAG

FREE Premium Magazine Style Blogger Template " TURN OUT MAG "

Over the last few days, so many readers commented on this site asking me to convert a Magazine style wordpress theme to Blogger version... So, for all you guys.. Releasing Premium Magazine style Blogger Template "TURN OUT MAG". This was originally a wordpress theme designed by ChiQ Montes and I converted it to Blogger version.

Screenshot
The template comes with so many built in features including:
» Thumbnails on homepage (automatic)
» Two main columns on the Homepage (Mag style)
» Banner ad / Adsense ready
» 468 x 60 px Banner ad on the header
» Three Columns
» Search Box
» SEO Optimized
» "Read More.." (automatic summarize)
» Featured Video
...and many more...


Step by Step Installation Guide:

(First backup your current template file before installing any new template)

Step 0: First, follow the Basic Template Installation steps here.

Step 1: Go to Settings » Formatting and select the Date Header format like the one shown below and Save the changes.Choose the DATE HEADER Format
Step 2 : Editing the top Navigation links:

Edit the Nav linksJust go to Layout » Edit html
and Look for this code:


  • Blogger Templates


  • Blog Tips


  • WP themes


  • Just look at the code.. You'll understand. Got it? Just replace the Anchor text (Blogger Templates, Blog Tips, WP themes ) with the corresponding links.

    Step 3: You can add 468 x 60 px Adsense ad on Right side of Header:

    Adsense ad on header
    Just go to Layout and click on "Edit" of the header widget as shown in the pic below:

    adsense adand paste you adsense code in the box and Save it.

    Step 4: Editing the Logo:

    editing logo

    The .psd file of the Header logo is included in the download file. Open it with Photoshop and edit the Site Name and description and Save it as image file (.jpg)
    Next, upload the image to any image hosting services like Photobucket, Tinypic,etc and after uploading, they will give you a direct link to that image file.

    Go to Layout » Edit html and find this image url in the template code..

    http://i44.tinypic.com/24exqxd.jpg


    and replace it with the one you uploaded and Save the template.
    (If you don't know editing the .psd file or If you don't have photoshop, just leave a comment here with your Sitename and description, I'll do it for you..)


    Now your Mag style template is successfully installed... Congrats :)

    Like the template ? or Have any questions ? Comment here...


    ---------------------------------------------
    Answers to Reader comments:

    Question: hi! how about the feed in the upper left corner, how can I edit that? thank you!!! (by weng cariyaga)

    Answer: To edit the feed url, just find this

    Posts


    and change it to like this


    Posts


    Don't forget to edit the YOUR-FEEDBURNER-URL with your feed address..


    Question:
    can you please tell me where to add a "share this" or "Addthis" button, and also a Digg button. I want the "share this" button to appear at the end of the post and the "Digg" with submission capability at the top on the main post page. thanks a lot in advance.

    To add Sharethis/add this button on the homepage:

    preview after adding addthis widget

    First go to addthis.com and select the button shown below and get the html code for that button.

    share this

    Next, go to Layout » Edit html and find this code
    Read More
    and replace it with this

    Read More / YOUR ADDTHIS CODE

    To add on the Post pages:
    Find this..


    and add your ADDTHIS code below those lines

    The digg option is already there in the sharethis widget..so, if you add digg button again,the homepage looks crappy.

    Labels: , ,

    How to backup Blogger template

    Why do I need to backup my blog template? you may ask. Because sometimes unexpected things happen, i.e. you accidentally mess up your layout. If you have the backup layout stored in your PC, then reverting to the original is easy. Less headache for you.
    You want to backup your template every time you want to tinker with the code. Better yet always keep a latest version of your template stored in your PC.
    Now that you understand the importance of having a template backup, let’s start doing it:

    Backing up a template

    1. Log in to your Blogger account (if you haven’t logged in already).
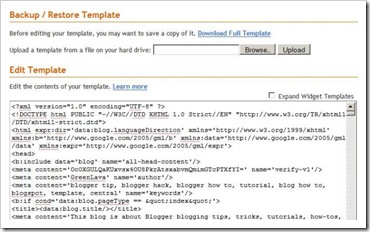
    2. Go to Dashboard > Layout > Edit HTML. Your screen will look like this:backup template
    3. Click the Expand Widget Templates checkbox.
    4. Position your cursor inside the code window and right click and choose Select All.
    5. Copy the code and paste it in Notepad or other text editor. For the sake of this tutorial, let’s name the file MyTemplateBackup.txt.
    6. Keep the file in a safe place.
    7. That’s it, you’ve backed up your blog template!

    Restoring a template

    Now whenever you want to restore your template, simply
    1. Repeat step 1 to 3 above.
    2. Open MyTemplateBackup.txt., Select All and copy.
    3. Position cursor inside your template code window, right click and Select All.
    4. Click Paste. The template code will be replaced by the code from MyTemplateBackup.txt.
    5. … and your template is restored.
    Enjoy!

    Labels: